Lord Generic Productions
A Crash Course
in Game Design and Production
Week 4 -
Basics of Computer Art and Art Specification
Welcome back! This is the fourth
installment in "A Crash Course in Game Design and Production.
Like last time, this lesson is in multiple parts. In PART ONE, we'll
discuss computer graphics in general, and what we need to know before
we can talk about ART. In PART TWO We'll discuss the ART
Specification, what it is and what we need to put in it. In PART
THREE we will discuss tile-based graphic screens and specifically how
we're going to approach maze creation for our course project, as well
as how to draw the tiles. In PART FOUR will write the fourth section
of the Design Spec for our Course Project, the Art Specification.
Part 3 -
Tile-Based Graphics, and Maze Creation
Often in game creation it becomes necessary to create multiple sets of game graphics and background images which contain similar details and repeating elements. It may be for a HUGE outdoor overhead map for a role-playing game showing landmarks, hills, trees, grass, monsters, etc., or as in our case, a bunch of similarly-constructed mazes, or whatever. As game designers and programmers, we need to be able to store, manipulate, and recreate these in our game, using as few graphic, memory, and hard disk storage resources as possible.
One common way of doing this is called "Tokenizing" the image. Instead of saving and loading all the images we could possibly need for our game, we break the image down into a small number of replicable parts - a set of graphic pieces that we can arrange to create the image we need when we need it. Usually, most pieces in this set are the same size, and will match up against other pieces in the set. The graphic pieces are generally called "tiles." The graphic screens are stored as a matrix of alphanumeric characters, called "tokens," with each character in the matrix corresponding to one of the graphic tiles.
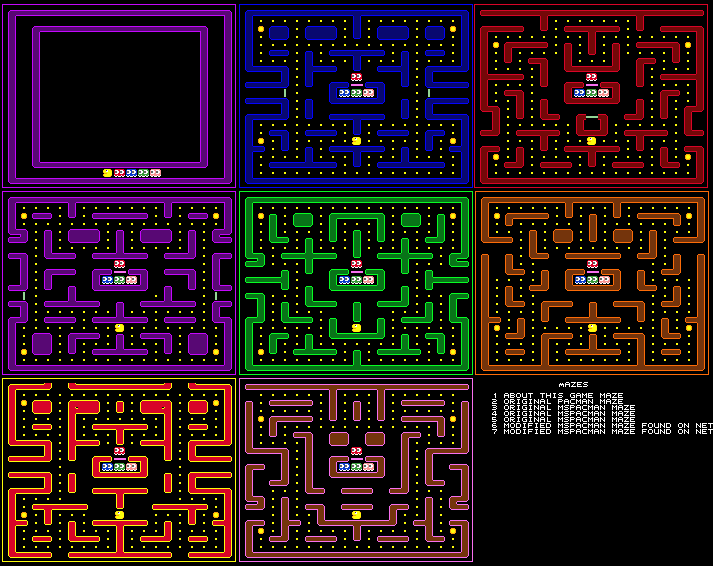
Here are the mazes I have created so far for Snack Attack!

The first "maze" is for the About this Game screen. The ghosts chase Snacky around the About this Game text. The next maze (top, middle) is the original Pacman maze, resized to fit our game window. The next four mazes (the red, purple, green, and brown ones) are the original mazes from Ms.Pacman, and the last two I found in hacked MsPacman roms on the net.
Looking at the mazes, you'll see that they all contain similar elements - rounded ends, right angle bends, segments that are the same length, etc.. To create these mazes, I took screen shots of the Pacman, et al, mazes and cut them up into 24 chunks. These 24 pieces arranged carefully, can recreate any maze a Pacman game can run.
Once I knew what the pieces needed to look like, I had to determine how to create a set we can use for our game. I had to make some creative and technical decisions to make the game easier to do and to make the mazes "fit" in our game window.

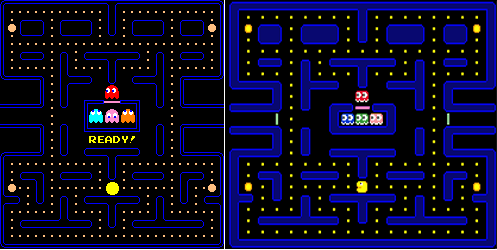
The mazes in the Pacman Arcade game are 1.5 times as tall as they are wide, and our game window is roughly square in mode 19, which has a 3:4 aspect ratio. In the Original, the maze borders are thinner than the maze obstacles, and the vertical spacing between obstacles alternates between high and short as we go from top to bottom in the maze. To limit the number of tiles we'd need and to make maze creation and AI programming easier, I decided to have one set of tiles for everything, and to make all the tiles the same size. Notice our borders and obstacles are the same thickness.
After a couple hours of tweaking, I determined the "correct" matrix size for our game is 19x22, with tiles that are 12x8 pixels in size. My primary criteria was being able to reproduce the original Pacman maze using uniform-sized tiles, and this maze needed to fit in a square game window as close as possible to the screen size we have. Our game window is about 8 pixels shorter than my other games, so I added the light blue border box around the game window, centered it, and adjusted the size of our feedback window to make it balance better. Since our Maze tiles are 12x8, for consistency sake, I set the graphics size for all the moving sprites to also be 12x8. This really is arbitrary, but it makes keeping track of them easier. Another upshot of having 12x8 tiles is we end up with about 1/3 fewer dots than the original.
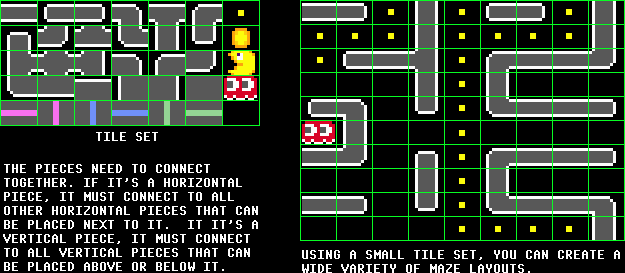
Here is our minimum tile set:

Notice that our tile set is not colored. In the game we need to draw the mazes in different colors, so our tile set here is black, white, and gray. When we draw the maze we'll color the white and gray pixels in each tile to the outline and interior color, respectively. Here I'm showing you the 2D "arcade" tile set, because it's easier to see how it fits together. I have a more solid, 3D pipes-look tile set in 10 colors that will be included in the final version of the game. It was constructed the same way, only I processed each tile in photoshop to make it look 3D like. We'll have a game option to choose between the two tile sets.
Our tile set contains a few extra tiles to correspond with new features we've added to the game. The 6 images along the bottom row are doors. The first two are doors for the penalty box. In Pacman and MsPacman, the penalty box is always in the same place, in the same orientation. The reason I think is that they needed to hardcode the location so that the ghost's eyes can find their way back to the box so that the ghosts can respawn when we kill them. For our game, we can just have the eyes target the Penalty box door, and they'll always find it, so we can put the Penalty box anywhere in the maze and it can have a vertical orientation if we want it to. Therefore I included a Horizontal and Vertical Penalty box door.
The next two doors are Ghost-Only doors. Snacky can't go through them. We may want to make passages for the ghosts so they can ambush Snacky. The last two doors are Snacky-only doors. We may want to block the ghosts from certain Snacky-safe escape routes.
Included in the tile set is a Dot, so we can place the dots only where we want them. Similarly, we can place energizers anywhere we want, and since Euphoria is flexible in redimentioning sequences, we can have as many of them in the maze as we'd like.
Our game will determine the starting positions and number of ghosts from the maze definitions, so we can place as many ghosts as we want to, anywhere in the maze. We MUST have a penalty box, with a Penalty Box Door, but we can have the ghosts start from anywhere.
Snacky's starting position will
also be determined by the maze definition. We can start the game with
Snacky anywhere we want.
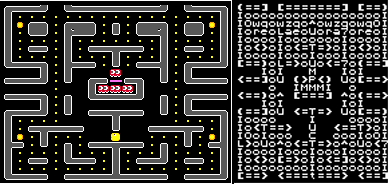
How do we choose the tokens for each tile? Arbitrarily. You can make any alphanumeric character represent any tile you want. I usually try to go for characters that look kinda like the tile, so when I look at the text representation, I can tell what the maze is. Here is a maze from Snack Attack! And it's corresponding text representation:

( is an upper left corner,
) is an upper right corner,
[ is a lower left corner,
] is a lower right corner,
< is a left ending horizontal
piece,
> is a right ending horizontal
piece.
O is an energizer and o is a dot.
C is the player's starting
position - because C kinda looks like Snacky.
M is a Ghost (M for Monster)
P is the Penalty Box door.
= is a horizontal piece.
You get the idea. When I run out of characters that look like tiles, I just start picking letters and symbols until I run out of tiles.
I store all the levels in the game (in the maze order shown above) back to back in one long sequence of sequences of sequences. Levels is all of the mazes, Levels[1] is the about maze, Levels[3][4][5] is the token at position 5,4 in the second level.(the red one in the image above - third maze in the sequence)
For our purposes, I have created a handy, dandy maze editor we can use to create the mazes. You click on the tile you want and then place it in the game window. The program indexes into the maze definition sequence and places the right token in the right place automagically.
If you haven't yet downloaded my
version of our course project, Snack
Attack!, do it now, and play it a million times to get an idea
for the game.
End of Week 4 -
Basics of Computer Art and Art Specification
Part 3
- Tile-Based Graphics and Maze Creation
If you have any questions for
group discussion or have any other questions, comments or
suggestions, email them to me to Pastor@BeRighteous.com
Mail monetary donations large or
small to
Lord Generic Productions
1218 Karen Ave Santa Ana, Ca 92704
A
Crash Course in Game Design and Production - Euphoria Edition
(C) Copyright 1996,2001 Lord
Generic Productions - All Rights Reserved